Simple Soft Circuit
In this post we are going to walk through an introductory soft circuit.
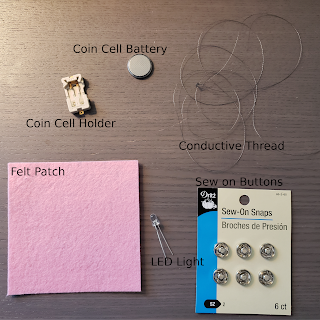
 Materials
1. Collect and assemble materials!
Collect the materials, they can be found at most local craft stores, or on your favorite web market. To make yourself ready to get creating, we need to get the felt into the embroidery hoop and the conductive thread into the needle.
To prepare I put the felt square into the embroidery ring along with a small piece specially cutout for the design that I had in mind.
 Holding the LEDs and the battery holder in place while trying to sew them can present a challenge as most of us have ten fingers at the best of times. To assist, I suggest using hot glue to fasten the circuit elements down before sewing them statically to the felt.
Start with a few loops around the connectors to ensure that the electrical connection is sound. Then make your stitch to the associated terminal on the other circuit elements. For help with knots, tying off thread, or stitching see the sparkfun sewing basics guide.
 Once all of the connections are made with conductive thread and the knots are all tied off we are ready to check that we have connected everything correctly.
First things first:
Does it light up when a battery is inserted?
If not there are a couple of things to check. First, make sure that the connections that you have sewn don't have any unintended shorts: that is, any connections that connect the two ends of the battery creating an unintended path of least resistance (other than the LED). Second, ensure that the positive terminal of the battery holder is connected to the positive terminals of all LEDs -- directionallity matters.
This second mistake is actually one that I made myself. After my LED failed to light up on the first try, I checked the terminals and realized my mistake. I then undid all of my stitches and knots and started again.
As an example I have created a simple lighthouse embroidery using thread and a small cutout of felt.
Others have used LEDs to create astrological signs, pizza, or a mask. The cell battery that we are using should be powerful enough to support numerous LED lights.


 Materials
- Conductive thread (~2 feet)
- White thread
- Coin cell battery
- Coin cell battery holder
- LED light (sew-able or regular)
- Embroidery hoop
- Felt Square
- Hot glue gun.
Get Going!
1. Collect and assemble materials!

Collect the materials, they can be found at most local craft stores, or on your favorite web market. To make yourself ready to get creating, we need to get the felt into the embroidery hoop and the conductive thread into the needle. 
To prepare I put the felt square into the embroidery ring along with a small piece specially cutout for the design that I had in mind.
2. Sew what?
The basics of sewing and their relevant techniques in wearable technologies can be found on sparkfun (an amazing resource). Holding the LEDs and the battery holder in place while trying to sew them can present a challenge as most of us have ten fingers at the best of times. To assist, I suggest using hot glue to fasten the circuit elements down before sewing them statically to the felt.
Start with a few loops around the connectors to ensure that the electrical connection is sound. Then make your stitch to the associated terminal on the other circuit elements. For help with knots, tying off thread, or stitching see the sparkfun sewing basics guide.
3. Check your work
 Once all of the connections are made with conductive thread and the knots are all tied off we are ready to check that we have connected everything correctly.
First things first:
Does it light up when a battery is inserted?
If not there are a couple of things to check. First, make sure that the connections that you have sewn don't have any unintended shorts: that is, any connections that connect the two ends of the battery creating an unintended path of least resistance (other than the LED). Second, ensure that the positive terminal of the battery holder is connected to the positive terminals of all LEDs -- directionallity matters.
This second mistake is actually one that I made myself. After my LED failed to light up on the first try, I checked the terminals and realized my mistake. I then undid all of my stitches and knots and started again.
4. Get creative with it.
Wearable circuits are both functional and creative -- as we have already finished the functional part we are ready to move on and flex some artistic muscles.As an example I have created a simple lighthouse embroidery using thread and a small cutout of felt.
Others have used LEDs to create astrological signs, pizza, or a mask. The cell battery that we are using should be powerful enough to support numerous LED lights.

Results!
Shout-out to my lovely assistant.


Comments
Post a Comment