Soft Switch
In this episode we are going to demonstrate another simple project for getting introduced to circuits and sewing. Our goal here is to make a soft switch by sewing a button onto a square of felt to close the connection. This will cover many of the same skills as the previous introductory project. However, developing garment skills and circuit skills takes practice and every new project reinforces those abilities.
As before, here are some useful links for this project:
As before, here are some useful links for this project:
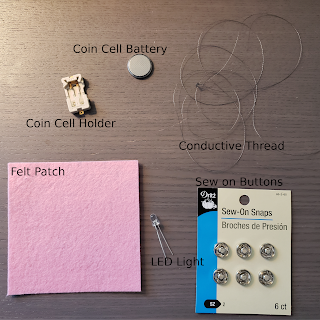
Without further ado lets collect our materials and get rolling!
- Felt Square
- Sew on Snaps>
- Conductive Thread
- Coin Cell Battery
- LED Light
- Coin Cell Battery Holder
Steps:
1. Buttons:
 Once you have the materials you are ready to go! The easiest place to start is with the buttons. You need to get them fastened down first. I sewed them into the corners by hand one at a time using normal thread for six out of the seven eyes on each side.
For the female side of the button I cut a small hole into the felt using some scissors and some rip-stop. This allows the button to sit more in line with the fabric.
 2. LED:
Second we need to situate the LED in one of the open corners (or another place of your choice). I started by testing the LED on the coin cell battery directly to identify the anode and the cathode (positive and negative ends). I then poked the terminals through the felt and bent them such that the LED was fairly secured.From one of the corners with a button half I sewed a running knot to the positive terminal (anode) using the conductive thread.

When tying off knots it can be helpful to use a dab of clean nail polish to finish off and keep you knots nice and tight.
3: Battery Holder:
Finally we are going to sew on the battery holder and connect everything up! From the second half of the button (on the opposite corner) of the felt from the one sewn previously, I made a running stitch to the positive terminal on the battery holder. This is important as LEDs are directional and switching up the terminals will mean that you need to start over.
Finally sew a direct running stitch from the negative terminal on the battery (cathode) to the negative terminal on the LED.
Results:
The circuit works! The light turns on and is rather bright. This is a good project for getting more familiar with both sewing and simple electronics. Making knots feel more natural and less obtrusive as well as keeping the stitches clean are some things that I was working on specifically. More practice is always better.Challenge!
A man has built three houses. Nearby there are gas water and electric plants. The man wishes to connect all three houses to each of the gas, water and electricity supplies.Unfortunately the pipes and cables must not cross each other. If we place all three houses on one side of the felt, and have a red, white, and blue LED to represent gas, water, and electricity respectively ... How would you connect each of the 3 houses to each of the gas, water and electricity supplies?


Comments
Post a Comment